An FMEA is only as useful as the discipline behind the scoring. Too many reliability reviews start strong, fill a spreadsheet with failure modes, then quietly stall because nobody agreed what a severity of 7 actually means versus an 8. This free template gives you the structure — failure mode, effect, cause, and severity, occurrence and detection scoring — that reliability teams use to keep an FMEA consistent from the first review to the tenth. Sign up free to build a live version of this analysis once a spreadsheet stops scaling.
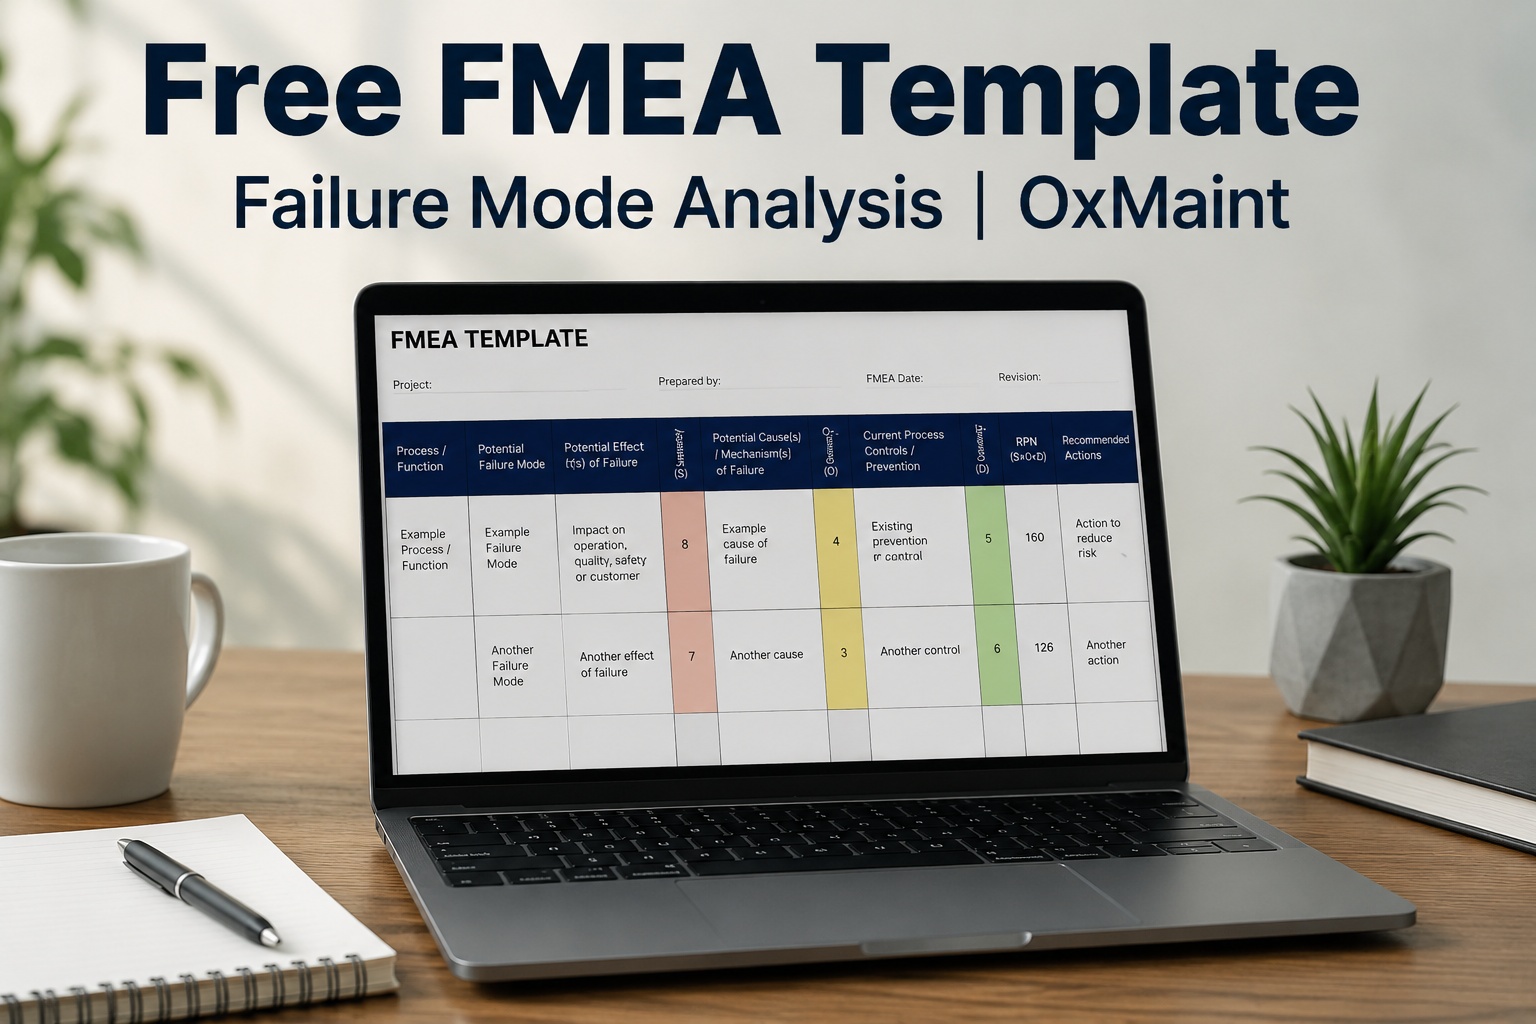
Free FMEA Template
Excel-ready. Pre-built columns for failure mode, effect, cause, S-O-D scoring and automatic RPN calculation — structured to AIAG-VDA conventions.
.XLSX format
No sign-up wall
Auto RPN formula
What's Inside the Template
The template follows the structure a cross-functional FMEA review actually needs — enough columns to capture the analysis properly, without so many that the sheet becomes unusable in a live workshop.
Failure Mode
How the component or process could fail
Effect
What happens downstream if it occurs
Cause
Root mechanism driving the failure mode
S · O · D Scores
Severity, occurrence and detection, 1-10 each
RPN (Auto-Calculated)
S × O × D, computed automatically per row
Recommended Action
Owner, due date and corrective action
Understanding the S × O × D Score
Each failure mode gets three ratings, each on a scale of 1 to 10, and the three are multiplied together to produce the Risk Priority Number. An 8 × 3 × 3 risk is mathematically different from a 3 × 8 × 3 risk, despite landing on the same RPN of 72 — which is exactly why the raw number alone doesn't tell the full story.
Severity
1 = no effect → 10 = hazardous, no warning
×
Occurrence
1 = remote → 10 = almost certain
×
Detection
1 = certain to detect → 10 = cannot detect
Example: Severity 9, Occurrence 2, Detection 4 → RPN = 72. Severity 9 alone flags this for priority review regardless of the final RPN.
This is exactly the kind of case a raw RPN threshold would miss, and Action Priority is designed to catch.
Why RPN Alone Can Mislead Prioritisation
The AIAG-VDA FMEA handbook moved away from ranking purely by RPN and introduced Action Priority (AP) instead — a method that weighs severity first, then occurrence, then detection, rather than treating all three as equal multipliers. Book a free demo to see risk-weighted prioritisation applied automatically to your own FMEA data.
Raw RPN Ranking
Treats severity, occurrence and detection as equal
A low-severity, high-occurrence risk can outrank a catastrophic one
Teams often set an arbitrary cut-off (e.g. RPN over 100)
Action Priority (AP)
Weighs severity first, then occurrence, then detection
A severity 9 or 10 always flags for priority attention
Outputs a clear High / Medium / Low priority, not just a number
See Your FMEA Scored and Prioritised Automatically
Watch how OxMaint calculates RPN and Action Priority together, then connects corrective actions straight to work orders.
Expert Perspective: Keeping an FMEA Honest Over Time
The biggest failure in FMEA isn't a missed failure mode — it's scoring drift. One reviewer's severity 6 is another's severity 8, and without a shared reference table, the same failure mode gets rated differently every time the sheet is revisited. Teams that keep FMEA useful long-term standardise their scoring criteria once, in writing, and hold every review to that same standard.
Score Against a Shared Table
Write down what each 1-10 value means for your process once, so every reviewer scores the same failure mode consistently.
Never Ignore High Severity
A severity of 9 or 10 deserves priority attention regardless of how low the resulting RPN calculates.
Verify, Don't Assume
Don't lower an occurrence or detection score just because an action was planned — confirm the control actually works first.
A shared scoring standard, applied consistently, matters more than any individual scoring decision.
Common Failure Mode Categories to Start From
Starting an FMEA from a blank sheet is intimidating — most teams find it faster to work through common failure categories first, then narrow to the specific modes relevant to their equipment.
Mechanical
Wear, fatigue, misalignment, corrosion
Electrical
Insulation breakdown, connection failure, overload
Process
Contamination, incorrect setup, sequence error
Human Factor
Missed step, incorrect procedure, training gap
These aren't exhaustive — they're a starting checklist to make sure obvious failure paths aren't overlooked before the review dives into specifics.
Running an FMEA as a Cross-Functional Review
An FMEA completed by one engineer in isolation misses the operational knowledge that makes the analysis useful. Include people from maintenance, production and quality alongside design or process engineering — technicians and operators often know failure patterns nobody wrote down anywhere else. Sign up free and invite your review team to work from the same live analysis.
Agree a written S-O-D reference table before scoring begins
Include maintenance and operations, not just engineering
Decide whether you'll use RPN, Action Priority, or both
Set a review cadence so scores get revisited, not left static
Turning FMEA Findings Into Scheduled Work
A completed FMEA sitting in a shared drive rarely changes anything on its own — the value comes from connecting high-priority failure modes to actual maintenance tasks. Once a corrective action is agreed, it should generate a work order and feed into the relevant PM schedule, not wait for someone to remember to action it separately.
Completing a corrective action isn't the end of the FMEA cycle — the ratings should be revisited afterwards to reflect the residual risk once the action is confirmed effective. A lower occurrence or detection score is only justified once the control has been verified in practice, not simply because a plan exists on paper.
Frequently Asked Questions
What's the difference between DFMEA and PFMEA?
DFMEA (Design FMEA) analyses potential failure modes in a product's design, focusing on how the design itself could fail to meet requirements. PFMEA (Process FMEA) analyses failure modes in how a product is manufactured or a process is executed — where maintenance and reliability teams typically focus. This template's structure works for either, though the specific failure modes and causes you capture will differ.
How do I score severity, occurrence and detection consistently?
Use a written reference table that defines what each 1-10 value means for your specific process or equipment, and apply it the same way across every review. Generic guidance exists (severity 10 typically means a hazardous effect with no warning, for example) but exact definitions should be adapted and documented for your organisation, then used consistently rather than re-interpreted by each reviewer.
Should I use RPN or Action Priority to prioritise actions?
The AIAG-VDA FMEA handbook recommends Action Priority (AP) over raw RPN because it weighs severity first, avoiding the situation where a high-occurrence but low-severity risk outranks a rare but catastrophic one. Many teams calculate both — RPN as a familiar reference number, and AP as the primary method for deciding what actually gets actioned first.
Who should be involved in completing an FMEA?
FMEA works best as a cross-functional exercise rather than one person's assessment. Depending on scope, include design or process engineering, quality, production, maintenance, and testing — operators and technicians in particular often hold practical knowledge about how a process actually behaves that isn't captured anywhere else in the organisation.
Can I import this FMEA template into OxMaint later?
Yes. The template's column structure maps directly onto OxMaint's FMEA and reliability fields, so importing existing analysis is a straightforward upload rather than manual re-entry. Once imported, RPN and Action Priority calculate automatically, and recommended actions can be linked directly to assets and work orders.
Turn FMEA Findings Into Scheduled Maintenance
Connect failure modes, scoring and corrective actions to your live maintenance data. See it with your own assets in a free 30-minute walkthrough.